KimberlyCaristi

Search Results
48 results found with an empty search
- Marshmallow Dessert | Kimberly Caristi
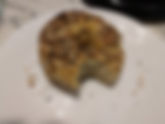
< Back Marshmallow Dessert Kimberly Caristi Oct 1, 2025 This dessert brings back so many memories. In 1995 we lived in Slovenia and we brought our five-year-old daughter and ten-year-old son. Our son went to an International school so he was gone from seven until one in the afternoon. That left me with a rambunctious little girl who didn’t care if we had a clean house or what we were having for dinner. She wasn’t a big fan of grocery shopping either but with a bribe she would be a good girl meaning she wouldn’t whine, complain or wander off. Her treat would be a doughnut or a couple of times I bought her one of these. The first time I bought one I thought I would be getting some of it. To my surprise and disappointment she ate the whole thing except a tiny bit she gave me when I asked if I could try it. When we got home from Slovenia we were asked if we would take part in a fundraising event. We donated a Slovene dinner and I made this as the dessert. I had figured out how to make it. I made a better base but the rest of it was pretty dead on. This stay was our fifth time to Slovenia and it was another five month stay. I wanted to buy this dessert for friends who visited us because I wanted to see if the dessert tasted like they did thirty years ago. We bought four and they protested that it was too much. Let me tell you they were all gone in minutes. They are so easy to eat and if you like fluffy marshmallows and chocolate you will love it. The ones I made I used a seven-minute frosting as the filling. I saw little difference. In fact, I was looking at some of the recipes and some have a cream filling. I am sure that it is a dessert that has a multitude of recipes like our chili here in the U.S. or spaghetti sauce here or in Italy. Previous Next
- Arancini | Kimberly Caristi
< Back Arancini Prep Time: from beginning to the end about an hour depending how big your pot is. Cook Time: four or five minutes each Serves: 20 Level: About the Recipe Arancini are a street food of Sicily. When we visit my husband's family in Ganzirri in the Messina region of Sicily this is a must have predinner snack. The ones we have either have mozzarella with peas and a red sauce or with a meat sauce in the center. The ones I made here are with feta. I thought the feta would go well with the artichoke and lemon. If I could have cow's milk (off it since August of 2024) I might have gone with a pepper jack cheese or a provolone. I like to mix it up with what I put in the center unless I make it for an Italian dinner then I make these authentic. Even the risotto I play with what I put in it. I once went to a restaurant in the Marche and had a strawberry risotto. My husband had a beer and mushroom risotto and it had a strong smokey Italian cheese in it. One of the reason I love eating in Italy is you find so many different cheeses than you get here. Can you imagine getting a cheese with tiny sticks and leaves around the ball of cheese here in the states? I have gotten such a cheese in Italy. It was so good. I am giving you permission to experiment on what cheese you put in your arancini but please leave the cheddar and American for a grilled cheese sandwich. Make sure it melts because a gooey cheese is so much better. I thought the feta tasted good but I did miss the strings of cheese pulling away from the arancini as bit into it. Ingredients Vegetable oil, for deep-frying (I prefer sunflower oil. In Slovenia it was so cheap I wanted to bring home a suitcase full.) Arancini mixture 2 large eggs, beaten to blend 2 cups Lemon Artichoke Risotto, recipe on my website, cooled 1/2 cup grated Romano 2 ounces feta, cut into 1/2-inch cubes Rice flour for rolling the balls in (about a cup) 2 eggs, beaten with a tablespoon of water 1 1/2 cups dried bread crumbs (fine works better though in the picture I used panko. Again, I like to play with the recipe.) Salt Preparation Pour enough oil in a heavy large saucepan to reach the depth of 3 inches. Heat the oil over medium heat to 350 degrees F. Stir beaten 2 eggs, risotto, Romano, in a large bowl to combine. Place three medium shallow bowls (I find our pasta bowls work well for this) in a row. In the first bowl is for the rice flour (about a cup). The second bowl is for the eggs, beat the two plus a tablespoon of water. In the third is for the breadcrumbs. Using about 2 tablespoons of the risotto mixture for each, form the risotto mixture into 1 3/4-inchdiameter balls. Insert 1 cube of feta (or the traditional mozzarella) into the center of each ball. Roll the balls (make sure each step you completely cover the ball) in the rice flour, then roll in the beaten egg, lastly roll in the bread crumbs to coat. Working in batches, add the rice balls to the hot oil and cook until brown and heated through, carefully turn them as necessary, about 4 minutes. Using a slotted spoon, transfer the rice balls to paper towels lined cookie sheet to drain. Season with salt. Let rest 2 minutes. Serve hot. They can be frozen for a couple of months and I reheat them in my air fryer or oven until hot. Previous Next
- January 2026 | Kimberly Caristi
< Back January 2026 Kimberly Caristi Jan 25, 2026 After my husband retired he started volunteering at the Habitat store. He came home all excited. He had bought a white Christmas tree that he was going to use on our front porch as a decoration. He begged me to come out and see the tree. This is what my husband thought was a white tree. The “needles” were falling off it. I have to confess it didn’t look that bad at night but I cringed during the day when I had to drive by it or look out the window. BTW, my husband’s name is not Charlie Brown. 😊 My January news letter is late this month because I fell on Christmas day. I hurt my ACL, PCL and tore a ligament in my knee. May I suggest when you see a tripping hazard that you move it right away and not think you will get it later. Recovery is slow so my post on social media has been effected. I haven’t been out of the house except to go to therapy and the doctor. I hope your Christmas was a delight and you are having a blessed beginning of the New Year. Previous Next
- Peanut butter cookies | Kimberly Caristi
< Back Peanut butter cookies Prep Time: About ten to fifteen minutes Cook Time: 8-10 minutes Serves: 48 to 60 depending on the size of balls you make. Level: easy About the Recipe Ingredients · 1 cup brown sugar · 1 cup sugar · 1 cup butter · 1 cup peanut butter · 1 eggs · 3 cups flour · 2 tsp. soda Preparation Cream sugars and butter until the color changes to a lighter color. Add peanut butter mix well then beat in egg. Mix together the three cups of flour and 2 teaspoons of baking soda then add to the peanut butter mixture and mix until no flour streaks. You can refrigerate if you want or roll into one-inch balls and place on a baking sheet 2 inches apart. Use a fork to press in a cross hatch. Bake at 350 for 8-10 minutes Previous Next
- Bookshelf | Kimberly Caristi
< Back Bookshelf Kimberly Caristi Nov 3, 2025 This isn’t an amazing picture at all! The importance of this picture is to show most of my cookbooks and the stories behind them. Many of them are from our 2008 study abroad when my husband took U.S. students to Italy to do a documentary on Italian food. My job on these trips were to help students stay with the group during tours. If you haven’t heard the term herding cats, nailing jelly to the wall or pouring water into a sieve you should try to keep thirty young adults following one person who is talking in a normal voice about what took place a thousand years ago while there are cars and motorcycles zipping by, tens or twenty different directions they could go, windows filled with pastries, clothes, perfumes, art, jewelry, or things they have not seen before and you will totally understand the before mentioned phrases. I was grateful that I have an uncanny ability to know how to get to places I have been told about, read about or drove by it once. In these travels I have been pulled away from the group by following a student who just had to go the bathroom, tied a shoe, just had to take a picture and probably a dozen other things and I have never lost a student and found the group in a timely matter. I have had one misstep but it wasn’t all my fault and I will leave that for another photo later on. I will tell you I have never lived it down and every time we get together with our Italian director, him and my husband love to retell the tale. I have gotten off track and need to bring it back to the cookbooks. I have really came into my own after that trip and finding all these cookbook neatly stacked in my kitchen. First, you should know we did buy them ourselves and let the students use them. Second, I realized I could make a recipe my own, meaning taking a recipe and adding this or that to it and it still be good. I had always known I could do that with baking as long as I didn’t throw off the fats, dry ingredients and liquids balance. I can bake for anyone but now I felt I could cook for Americans and do a pretty good job of making something that they would like, for Europeans I know I should make something less sweet (no applesauce with the pork but greens.) I can cook for Asians but I am not sure how to bake for them. Sad to say I have never had the opportunity to cook for anyone from Africa. I haven’t hosted them in my home…yet. I always do research on food from their area before we host someone. I never tell them it is their food because no one can cook exactly like their family. Example, I cooked what I thought was Chinese and our Chinese guest said “What do you call this Kim? It almost taste like Chinese.” Being that our guest was from Szechuan province and their spice level was quite a bit higher than ours I took that as a compliment. We had a guest from Slovenia who said she loved everything that came out my large saucepan. These cookbooks gave me the experience to experiment and I fell in love with cooking just as much as baking. Our friends noticed a difference. I have always had about a half a dozen recipes for a dinner that I used repeatedly. When I started mixing it up they took notice. When we started donating dinners our community notice that I was not just a chocolate nut or a baker. I have had two articles written about me on those subjects. I make my own truffles and for our Christmas party each year I would make about a dozen different cookies, a half a dozen bars, a half dozen other pastries plus a dozen different chocolates. I did offer other non-sweet items. The first few years of our marriage it was all store bought with a few personal bakes. I kept challenging myself to go bigger until it got too big. To make us feel a little better about all this over indulgence everyone invited were to bring dry goods for the food pantry in town. I look forward to sharing my recipes with you as time goes on. This past last month we have been travelling. I hope to get my photo albums up soon. We traveled through eleven states. North Dakota was our 48th contiguous state to visit and we got to it this time. We also got to see the head waters of the Mississippi river and I got to stand in it. I was so excited. We stayed in a cabin without a television, even more important no internet. We taught ourselves a new game of cards and the silence almost drove my husband nuts. I have to say I did miss the internet. I wish you all safe travels even if it is just to the grocery store to buy a new ingredient. Previous Next
- Garlic Bread | Kimberly Caristi
< Back Garlic Bread Prep Time: ten minutes Cook Time: fifty minutes Serves: 3 loaves or pizzas Level: easy About the Recipe Ingredients 2 pkgs. Yeast 1 ½ T. garlic salt 3 c. warm water 2 T. cooking oil ¼ c. sugar 8 c. flour (approx.) Preparation Dissolve yeast in warm water. Add sugar, garlic salt and oil. Mix. Stir in enough flour to make fairly stiff dough. Cover bowl with damp cloth and let rise until double in bulk. Divide dough in 3 parts. Roll into rectangles on a floured surface. Roll up as for jellyroll and tuck ends under. Slit top diagonally 3 or 4 times. Place on a greased baking sheet. Cover and let rise until double, about 40 minutes. Brush with water and sprinkle with a little garlic salt. Bake at 400 for 10 minutes. Repeat brushing with water and sprinkle garlic salt. Turn oven to 325 and bake 35 to 40 minutes more. Remove from oven to rack to cool and brush top with butter. This bread freezes real well and yields 3 large loaves. Variation: I have been know to make thick pizza crust with this dough Previous Next
- Bagels | Kimberly Caristi
< Back Bagels Prep Time: 15 minutes but you have to make them the day before Cook Time: 30 seconds of boiling 14 minutes of baking Serves: 8 Level: medium About the Recipe Ingredients 4 cups (22 oz) high-gluten flour 2 teaspoons salt 1 Tablespoon barley malt syrup 1 ½ teaspoons instant or rapid-rise yeast 1 ¼ warm water (80 degree F) 3 tablespoons cornmeal Preparation Because bagel dough is much drier and stiffer than bread dough, it takes longer for the ingredients to cohere during mixing. For this reason, we recommend that you neither double this recipe nor try to knead the dough by hand. Ost natural foods stores carry barley malt syrup. High-gluten flour might be more difficult to find. You can order both the syrup and the flour from The Baker’s Catalogue or King Arthur Flour: KingArthurFlour.com . (I use a wheat gluten from Red Mill. I use 1 teaspoon for every cup so in this recipe I use 4 teaspoons. I did order my barley malt on amazon.) 1. Using stand mixer fitted with dough hook, combine flour, salt, and barley malt in the bowl. Add yeast and water; mix at lowest speed until dough looks scrappy, like shreds just beginning to come together, about 4 minutes. Increase speed to medium-low; continue mixing until dough is cohesive, smooth, and stiff, 8 to 10 minutes. 2. Turn dough onto counter; divide into 8 portions, about 4 ounces each. Roll pieces into smooth balls and cover with plastic wrap to rest for 5 minutes. 3. Form each dough ball into a rope 11 inches long by rolling it under your out stretched palms. Do not tapper ends of rope. Shape rope into circle, overlapping ends of rope about 1 ½ inches. Pinch overlapped area firmly together, dampening it slightly with water if ends won’t stick. Place ring of dough around your hand at the base of your fingers and with overlap under your palm, roll dough ring several times, applying firm pressure to seal seam. Dough ring should be roughly same thickness all around. Dust rimmed baking sheet with cornmeal, place dough rings on sheet, cover tightly with plastic wrap, and refrigerate overnight (12 to 18 hours). 4. About 1 hour before baking, remove dough rings from refrigerator. Adjust oven rack to middle position and heat oven to 450 degrees. Pour water into large pot to depth of 3 inches and bring water to boil. 5. Working four at a time, drop dough rings into boiling water, stirring and submerging them with metal skimmer or slotted spoon, until very slightly puffed, 30 to 35 seconds. Remove dough rings from water and transfer them to wire rack, bottom side down to drain. 6. Transfer boiled rings, rough side down to parchment-lined baking sheet. Bake until deep golden brown and crisp, about 14 minutes rotating sheet halfway through baking. Use tongs to transfer to wire rack to cool. Serve warm or at room temperature. (bagels can be wrapped in double layers of plastic wrap and stored at room temperature for up to 3 days. Wrapped with additional layer of aluminum foil, bagels can be frozen for up to 1 month. To recrisp, thaw bagels at room temperature, if froze, and place unwrapped bagels in 450 degree oven for 6 to 8 minutes.) Topped bagels Dunk dough rings into one of the following ½ cup raw sesame seeds, poopy or caraway seeds, dehydrated onion or garlic flakes, or sea or kosher salt while they are still wet and sticky (at the end of step 5, after draining.) Everything bagels Dunk dough rings into a mixture of 2 tablespoons each sesame and poppy seeds and 1 tablespoon caraway seeds, sea or kosher salt, dehydrated onion flakes, and dehydrated garlic flakes. Or you can buy all ready made seasoning at the store. Cinnamon-raisin bagels Mix 1 teaspoon vanilla extract, 1 tablespoon ground cinnamon, and ½ cup raisins into flour, salt, and barley malt in step 1. Don't be scared about making your own flavors. I made a mulberry, blackberry and blueberry before. Previous Next
- Blueberry Scones | Kimberly Caristi
< Back Blueberry Scones Prep Time: 40 Cook Time: Serves: 8 Level: About the Recipe Ingredients 16 tablespoons unsalted butter (2 sticks), frozen whole (see note above) 1 1/2 cups fresh blueberries (about 7 1/2 ounces), picked over (see note) 1/2 cup whole milk 1/2 cup sour cream 2 cups unbleached all-purpose flour (10 ounces), plus additional for work surface 1/2 cup sugar (3 1/2 ounces), plus 1 tablespoon for sprinkling 2 teaspoons baking powder 1/4 teaspoon baking soda 1/2 teaspoon table salt 1 teaspoon grated lemon zest Preparation It is important to work the dough as little as possible—work quickly and knead and fold the dough only the number of times called for. The butter should be frozen solid before grating. In hot or humid environments, chill the flour mixture and work bowls before use. While the recipe calls for 2 whole sticks of butter, only 10 tablespoons are actually used (see step 1). If fresh berries are unavailable, an equal amount of frozen berries (do not defrost) can be substituted. An equal amount of raspberries, blackberries, or strawberries can be used in place of the blueberries. Cut larger berries into 1/4- to 1/2-inch pieces before incorporating. Refrigerate or freeze leftover scones, wrapped in foil, in an airtight container. To serve, remove foil and place scones on a baking sheet in a 375-degree oven. Heat until warmed through and recrisped, 8 to 10 minutes if refrigerated, 16 to 20 minutes if frozen. See final step for information on making the scone dough in advance. directions 1. Adjust oven rack to middle position and heat oven to 425 degrees. Score and remove half of wrapper from each stick of frozen butter. Following photo at left, grate unwrapped ends on large holes of box grater (you should grate total of 8 tablespoons). Place grated butter in freezer until needed. Melt 2 tablespoons of remaining ungrated butter and set aside. Save remaining 6 tablespoons butter for another use. Place blueberries in freezer until needed. 2. Whisk together milk and sour cream in medium bowl; refrigerate until needed. Whisk flour, 1/2 cup sugar, baking powder, baking soda, salt, and lemon zest in medium bowl. Add frozen butter to flour mixture and toss with fingers until thoroughly coated. 3. Add milk mixture to flour mixture; fold with spatula until just combined. With rubber spatula, transfer dough to liberally floured work surface. Dust surface of dough with flour; with floured hands, knead dough 6 to 8 times, until it just holds together in ragged ball, adding flour as needed to prevent sticking. 4. Roll dough into approximate 12-inch square. Following illustrations, fold dough into thirds like a business letter, using bench scraper or metal spatula to release dough if it sticks to countertop. Lift short ends of dough and fold into thirds again to form approximate 4-inch square. Transfer dough to plate lightly dusted with flour and chill in freezer 5 minutes. 5. Transfer dough to floured work surface and roll into approximate 12-inch square again. Sprinkle blueberries evenly over surface of dough, then press down so they are slightly embedded in dough. Using bench scraper or thin metal spatula, loosen dough from work surface. Roll dough, pressing to form tight log. Lay seam-side down and press log into 12 by 4-inch rectangle. Using sharp, floured knife, cut rectangle crosswise into 4 equal rectangles. Cut each rectangle diagonally to form 2 triangles and transfer to parchment-lined baking sheet. 6. Brush tops with melted butter and sprinkle with remaining tablespoon sugar. Bake until tops and bottoms are golden brown, 18 to 25 minutes. Transfer to wire rack and let cool 10 minutes before serving. To Make Ahead: After placing the scones on the baking sheet, either refrigerate them overnight or freeze. When ready to bake, for refrigerated scones, heat oven to 425 degrees and follow directions in step 6. For frozen scones, heat oven to 375 degrees, follow directions in step 6, and extend cooking time to 25 to 30 minutes. Step-by-Step: Grating Butter Use the wrapper to hold the frozen butter while grating it on the large holes of a box grater. Grate 4 tablespoons from each stick of butter. Step-by-Step: Folding and Shaping the Scones 1. Fold dough into thirds (like a business letter). 2. Fold in ends of dough to form 4-inch square. Chill dough. 3. Reroll dough into 12-inch square. Press berries into dough. 4. Roll dough into jellyroll-like log to incorporate blueberries. 5. Lay log seam-side down and press into even 12 by 4-inch rectangle. 6. Cut dough into 8 triangular pieces. I make them with whatever frozen berries I have. Previous Next
- No bake Peanut Butter Balls (from my great aunt Izzy…Isabelle Keith) | Kimberly Caristi
< Back No bake Peanut Butter Balls (from my great aunt Izzy…Isabelle Keith) Prep Time: If you are more organized than me it will take less than a couple of hours and the amount of times you doubled the recipe will take longer. Cook Time: Serves: depends on the size of the balls you make Level: medium About the Recipe No Bake Peanut Butter Balls are worth the work. It's not difficult it just takes some patience. Ingredients 1 cup peanut butter (2 cups weight 19 oz) 2 Tablespoons butter 1 cup powdered sugar (4 ¼ oz) 1 ½ cups rice crispies 6 oz. chocolate pieces ¼ of a stick of paraffine Preparation Combine peanut butter, powdered sugar and butter mix well. Gently mix in the rice crispies. I usually do this with my hands so I don’t crush the rice crispies. Shape into small balls and place on wax paper covered cookie sheet and refrigerate for a while makes it easier to dip into chocolate. You might have to reroll the balls before you dip them. Melt chocolate pieces and paraffine in double boiler until smooth. Use a tooth pic to dip balls into melted chocolate set on wax paper covered cookie sheet. Previous Next
- Photo gallery | Kimberly Caristi
Find pictures taken by Kimberly Caristi from her travels around the United States, Italy, Slovenia, and Greece. Charleston, SC Italy 2022 Greece 2022 Frederik Meijer Gardens & Sculpture Park 2023 The beautiful Meteor Crater rest areas in Arizona Central Park, Chesterfield, MO Sunset Hotel in Moriarty, NM Lake Oconee, GA Lake Norman, NC Waterfalls in Franklin NC Slovenia Graz, Austria Italy 2025 Mims, Florida Hollywood, FL
- About | Kimberly Caristi
Get to know Kimberly Caristi, the author, traveler, cook and photographer. Kimberly, originally from St. Louis, embraced her move to the countryside at thirteen. It was the start of her looking forward to change. Throughout her life each significant event has contributed to her growth, shaping her into the person she is today. Especially her marriage to a wonderful man and the births of her son and daughter. Having lived in several places in the Midwest and spending enriching months in Slovenia, Italy, and Greece, she still holds St. Louis close to her heart. Raising two independent children was her main career, which she loved. Her side careers were working as an artist, fundraising, and working for non-profit groups while volunteering her time in the community. Her husband said she was a stay-at-home mom who was never home. With a passion for cooking and baking, Kimberly has made a name for herself in each community she has lived in. Kimberly’s favorite comment came from her Italian born mother-in-law when she said Kimberly was more Italian than her. Since 2020 she has channeled her creativity into her writing. If you can't guess Kimberly loves sunsets especially over the sea.